Як швидко і безпечно замінити лампочку автомобільної фари
Опубліковано на
6 березня 2026 року
Заміна лампочки автомобільної фари - одне з найпоширеніших завдань технічного обслуговування автомобіля, проте багато водіїв не знають, з чого почати.
У цьому посібнику ви дізнаєтеся, як визначити, коли потрібно замінити лампи фар, які інструменти підготувати, а також про правильні кроки для заміни галогенних, HID і світлодіодних ламп.
Ми також розглянемо загальні проблеми, відмінності між брендами та проблеми, з якими ви можете зіткнутися після встановлення.
Зміст
Як визначити, що лампи в моїх фарах потребують заміни?
У деяких автомобілях, що використовують HID- або галогенні лампи фар, їх потрібно замінювати після певного періоду експлуатації. Щоб визначити, чи потрібно замінювати лампи фар, ви можете врахувати такі фактори, як яскравість світла, зовнішній вигляд лампи та цикл використання.
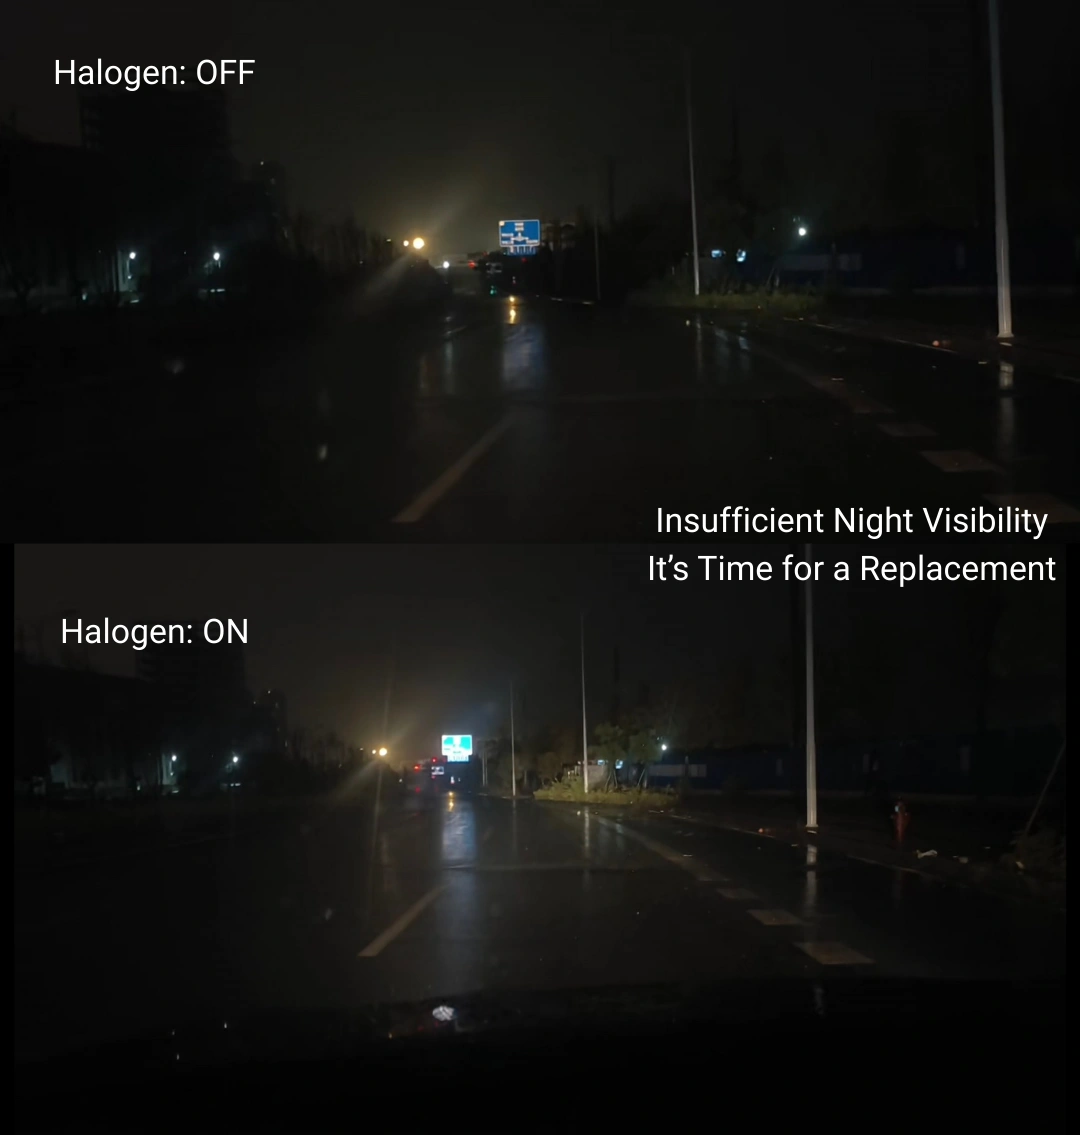
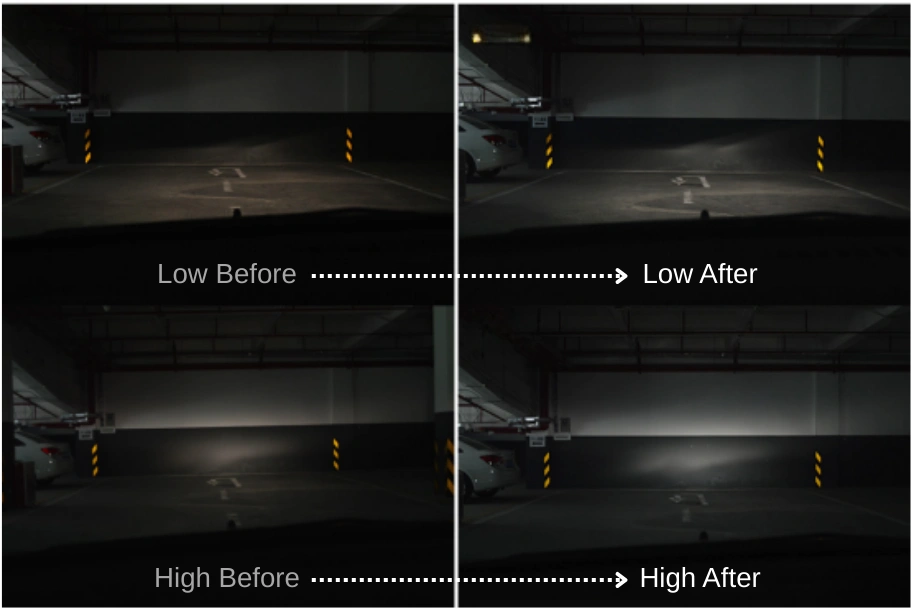
1. Низька яскравість:
Якщо ви їдете вночі і помічаєте, що ваші фари світять не так яскраво, як раніше, або дорога попереду не така чітка. Наприклад, раніше ви могли бачити дорожній знак за 100 метрів, а зараз він виглядає розмитим, швидше за все, настав час їх замінити.
З часом галогенні та HID лампи тьмяніють, цей процес називається світло занепад. Це означає, що ваша нічна видимість погіршується зі старінням ламп.
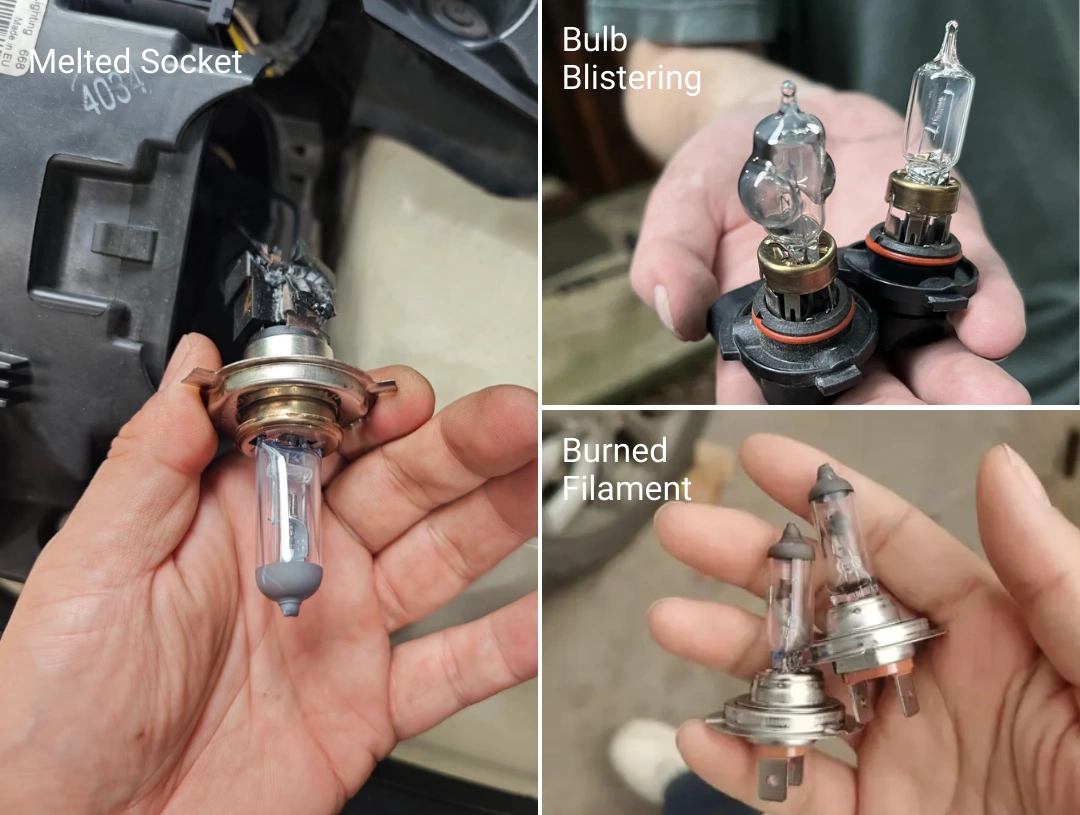
2. Перегоріла або пошкоджена лампочка:
Якщо лампочка має видимі дефекти, якщо проводка або цоколь перегоріли через перегрів, або якщо пошкоджена нитка розжарення, то в будь-якій з цих ситуацій лампочку потрібно замінити.
3. Вичерпано термін експлуатації: Термін експлуатації
Частота використання є важливим фактором, що впливає на цикл заміни ламп автомобільних фар. Якщо ви часто їздите вночі, знос ламп також прискорюється.
Наприклад, галогенні лампи зазвичай рекомендується перевіряти або замінювати кожні 1 рік або 20 000 км, HID-лампи - кожні 3 роки або 50 000 км, а світлодіодні фари - кожні 5 років або 100 000 км.
Однак ці інтервали заміни не є абсолютними стандартами. Їх слід оцінювати на основі фактичних умов використання, змін яскравості та загальної продуктивності.
Які фактори слід враховувати при покупці лампочок?
Це чотири найважливіші фактори, які слід враховувати при виборі лампи для автомобільних фар. Для більш детального пояснення та експертних порад щодо вибору правильної лампи читайте наш посібник: Світлодіодні лампи для фар: Покрокова інструкція.
1. Колірна температура:
4300K-6000K забезпечує кращу видимість під час нічного водіння. 3000K-4300K має сильну проникаючу здатність в дощову або туманну погоду. 5800K - 6000K забезпечують більш чітке бачення в ясні ночі.
Однак для забезпечення легальності краще вибирати таку ж колірну температуру, як і в оригінальних автомобільних лампах.
Автомобільні фари не завжди тим краще, чим вони яскравіші. Найкраще обирати лампи з аналогічною потужністю, що й оригінальні. Лампи з надмірно високою потужністю можуть легко пошкодити корпус фари, а також викликати відблиски, що погіршують видимість для зустрічних водіїв.
3. Бренд і якість:
Вибір високоякісних фар гарантує їх довговічність та продуктивність. Вибираючи фари від відомих брендів, таких як NAOEVOгарантує якість продукції та післяпродажне обслуговування.
4. Відповідати нормативним вимогам:
У різних країнах і регіонах діють різні правила щодо автомобільних фар. Вибираючи фари, переконайтеся, що вони відповідають місцеві нормативні вимоги.
Інструменти та підготовка перед заміною лампи фари
1. Вимкніть і охолодіть:
Перед запуском переконайтеся, що автомобіль повністю вимкнений, і дайте фарам охолонути. Нещодавно використані лампи можуть бути дуже гарячими і викликати опіки.
2. Використовуйте належні інструменти та носіть рукавички:
Підготуйте відповідні інструменти згідно з інструкцією до вашого автомобіля (наприклад, для деяких моделей, таких як Volkswagen Polo, може знадобитися викрутка Torx). Завжди носіть чисті рукавички, щоб запобігти потраплянню олії з пальців на лампочку і скоротити термін її служби.
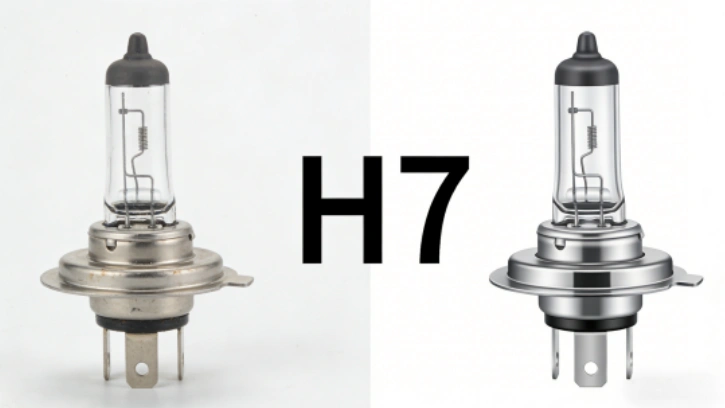
3. Виберіть правильний тип лампи:
Замініть лампочку на точно таку ж модель і потужність, як і оригінальна (наприклад, H1, H4, H7). Використання неправильного типу або більшої потужності може призвести до проблем з електрикою, перегріву або поганого освітлення.
Якщо ви замінюєте одну лампу, краще замінити обидві одночасно. Це заощадить час і забезпечить збалансоване, рівномірне освітлення на дорозі.
Покрокове керівництво:Як замінити галогенну лампу головного світла?
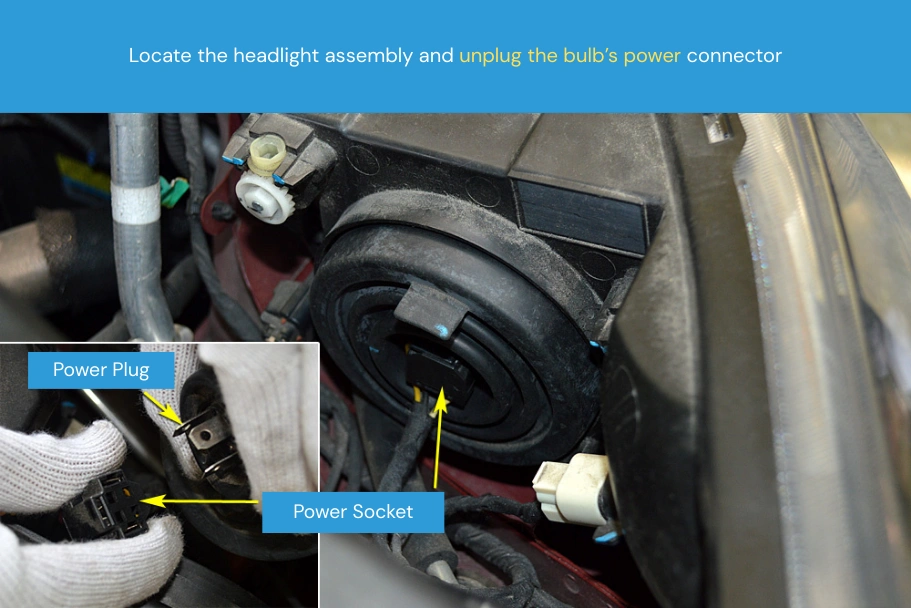
Крок 1: Від'єднайте роз'єм живлення від лампи.
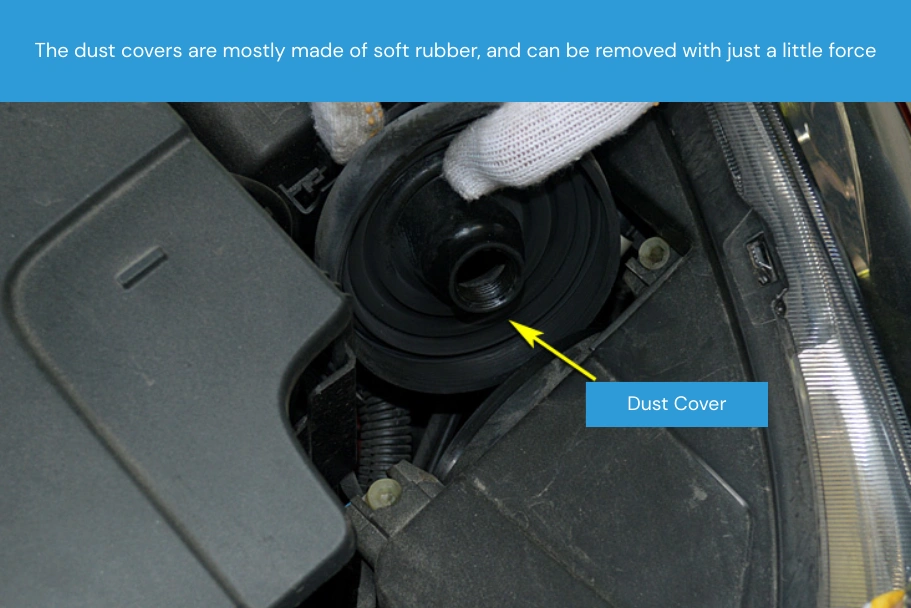
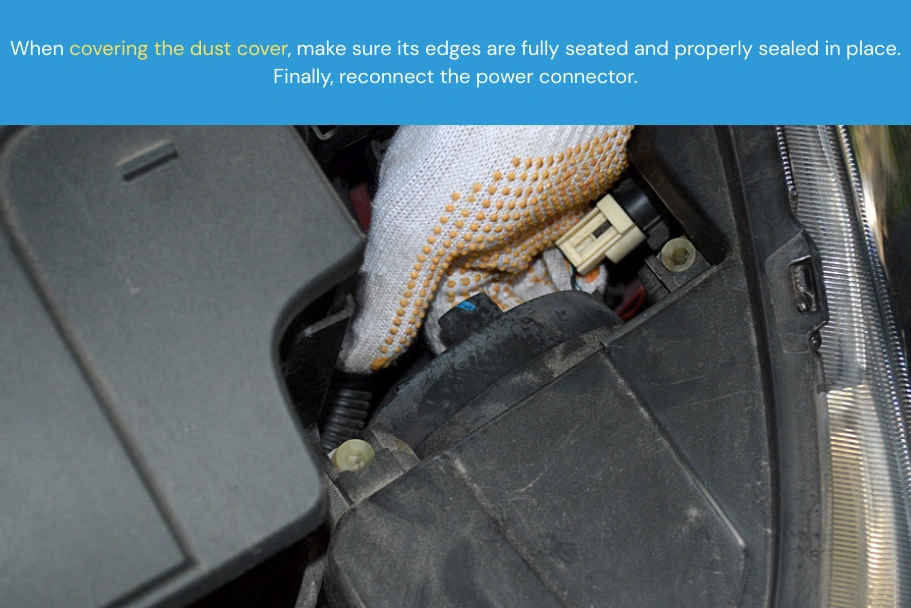
Крок 2: Зніміть кришку від пилу.
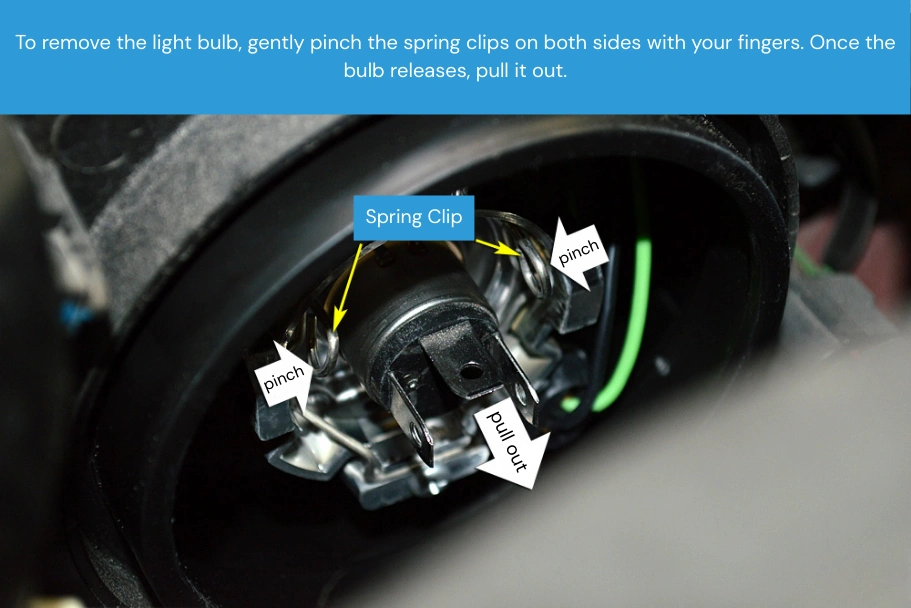
Крок 3: Вийміть лампу з корпусу. Зазвичай лампочка закріплена металевим пружинним затискачем, а деякі моделі також можуть мати пластиковий цоколь.
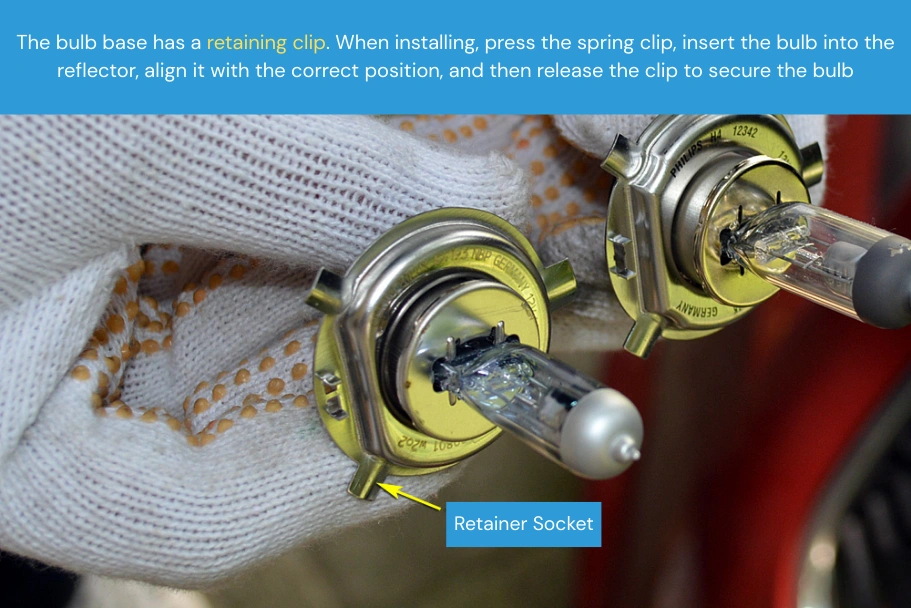
Крок 4: Вставте нову лампу в блок фари і вирівняйте її за допомогою монтажних прорізів. Натисніть на металеві пружинні затискачі всередину з обох боків, щоб надійно зафіксувати лампу в корпусі відбивача.
Крок 5: Закрийте пилозахисну кришку, знову під'єднайте роз'єм живлення лампи. Процес заміни завершено.
Крок 6: Увімкніть фари, щоб перевірити правильність роботи нової лампи.
⚠️Important Примітки:
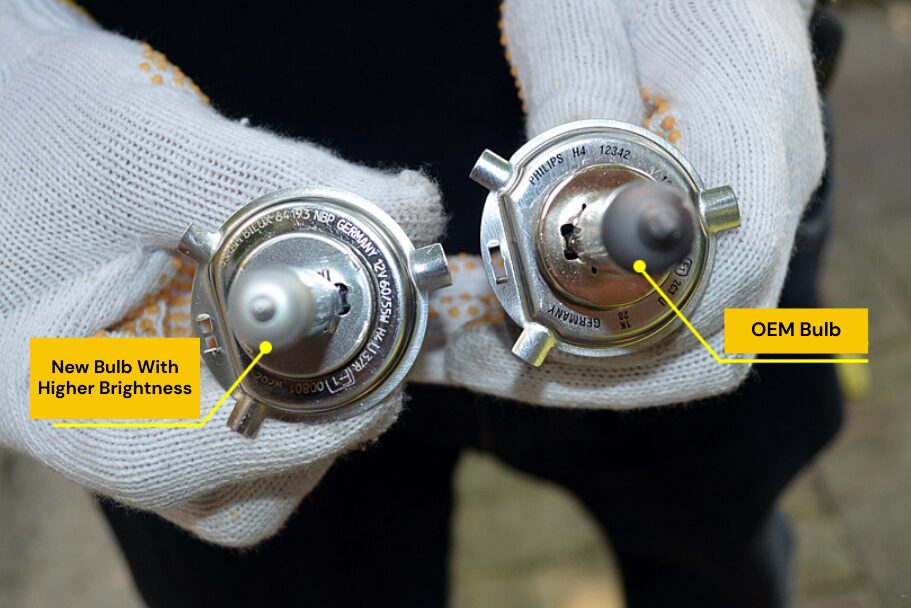
Критеріями вибору нової лампи є: схожі технічні характеристики, однакова структура та відповідність вимогам інспекції. На цьому зображенні і нова, і стара лампи - це моделі 12V 60W/55W, H4.
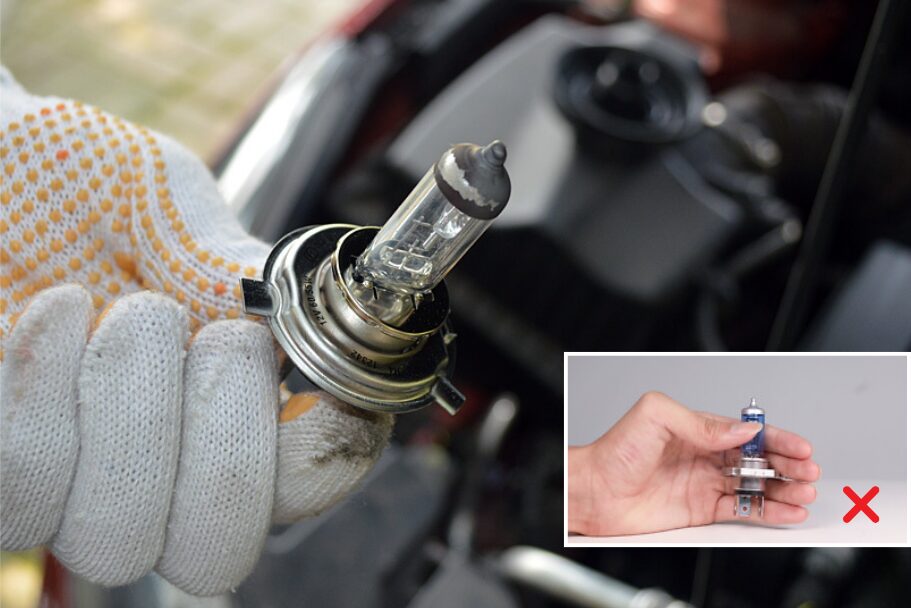
Не торкайтеся скляної поверхні лампочки пальцями. Це пов'язано з тим, що всередині лампи міститься газ, і навіть невелика кількість олії з ваших пальців на склі може скоротити термін її служби. З часом це також може збільшити ризик того, що лампочка потріскається або лопне.
Покрокове керівництво:Як замінити лампу HID фар?
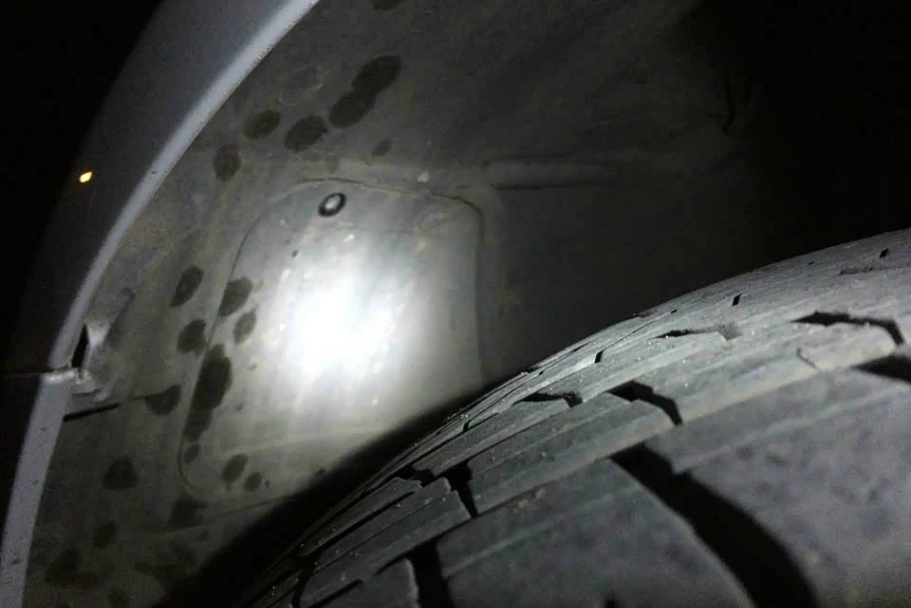
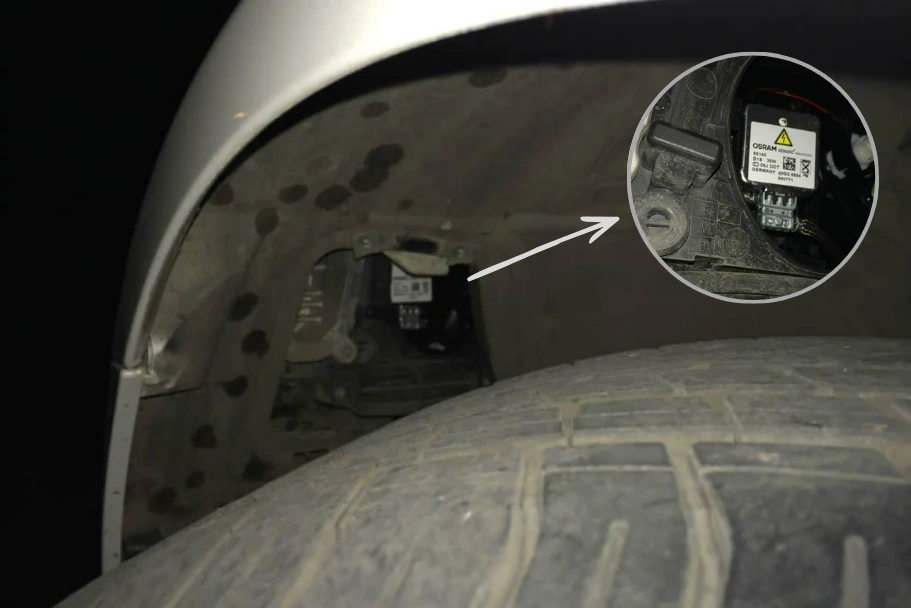
Крок 1: Отримайте доступ до фари HID
Залежно від вашого автомобіля, ви можете дістатися до HID-лампи з моторного відсіку або залізти за накладку крила. У деяких випадках може знадобитися зняти бампер або навіть всю фару в зборі. Хоча це може здатися додатковою роботою, зазвичай це дає більше простору для безпечної роботи і знижує ризик пошкодження розташованих поруч компонентів.
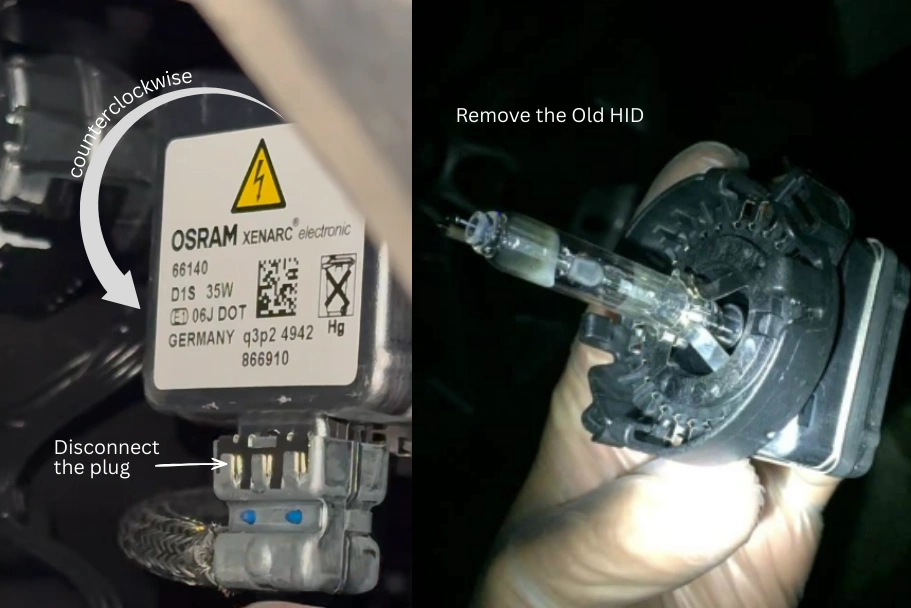
Крок 2: Вийміть стару HID-лампочку
Почніть зі зняття пилозахисної кришки на задній частині фари. Потім від'єднайте джгут проводів, прикріплений до лампи. Після цього поверніть лампу проти годинникової стрілки, зазвичай приблизно на чверть оберту, доки вона не ослабне і її можна буде безпечно вийняти з патрона.
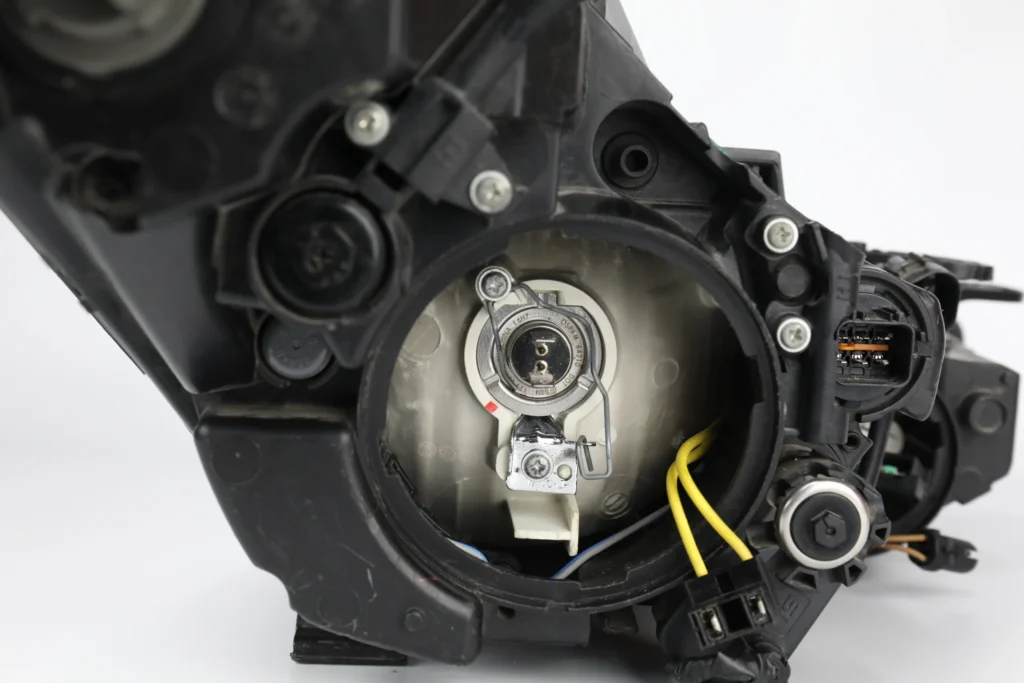
Крок 3: Встановіть нову HID-лампу
Розмістіть нову HID-лампочку так, щоб її виступи або насічки збігалися з прорізами в цоколі. Обережно вставте лампу, а потім поверніть її за годинниковою стрілкою, доки вона не зафіксується на місці. Після того, як вона надійно зафіксується, знову під'єднайте джгут проводів і встановіть на місце пилозахисну кришку, щоб захистити фару в зборі.
Крок 4: Перевірте фару
Увімкніть фари, щоб переконатися, що обидві лампи працюють належним чином. Перевірте форму променя і за потреби відрегулюйте вирівнювання.
Водночас слідкуйте за приладовою панеллю на наявність попереджувальних повідомлень, оскільки вони можуть свідчити про те, що нові лампи не повністю сумісні з баластною системою вашого автомобіля.
Покрокове керівництво:Як замінити галогенні лампи на світлодіодні?
Крок 1: Доступ до лампи фари
На різних автомобілях фари розташовані по-різному. До деяких можна дістатися, просто відкривши капот, тоді як для інших може знадобитися зняти деталі, дістатися через колісну нішу або навіть зняти передній бампер.
Вставте тримач світлодіодної лампи в монтажний паз, сумістіть виступи з пазом і зафіксуйте тримач за допомогою застібки. Вставте світлодіодну лампу в тримач, дотримуючись правильного положення.
Крок 4: Поверніть світлодіодну лампу за годинниковою стрілкою
Повертайте цоколь світлодіодної лампи за годинниковою стрілкою, доки він не займе правильне положення.
Крок 5: Підключіть вилку живлення
Підключіть блок живлення і перевірте, чи працює він належним чином.
Різні типи ламп фар і чим відрізняється їх заміна?
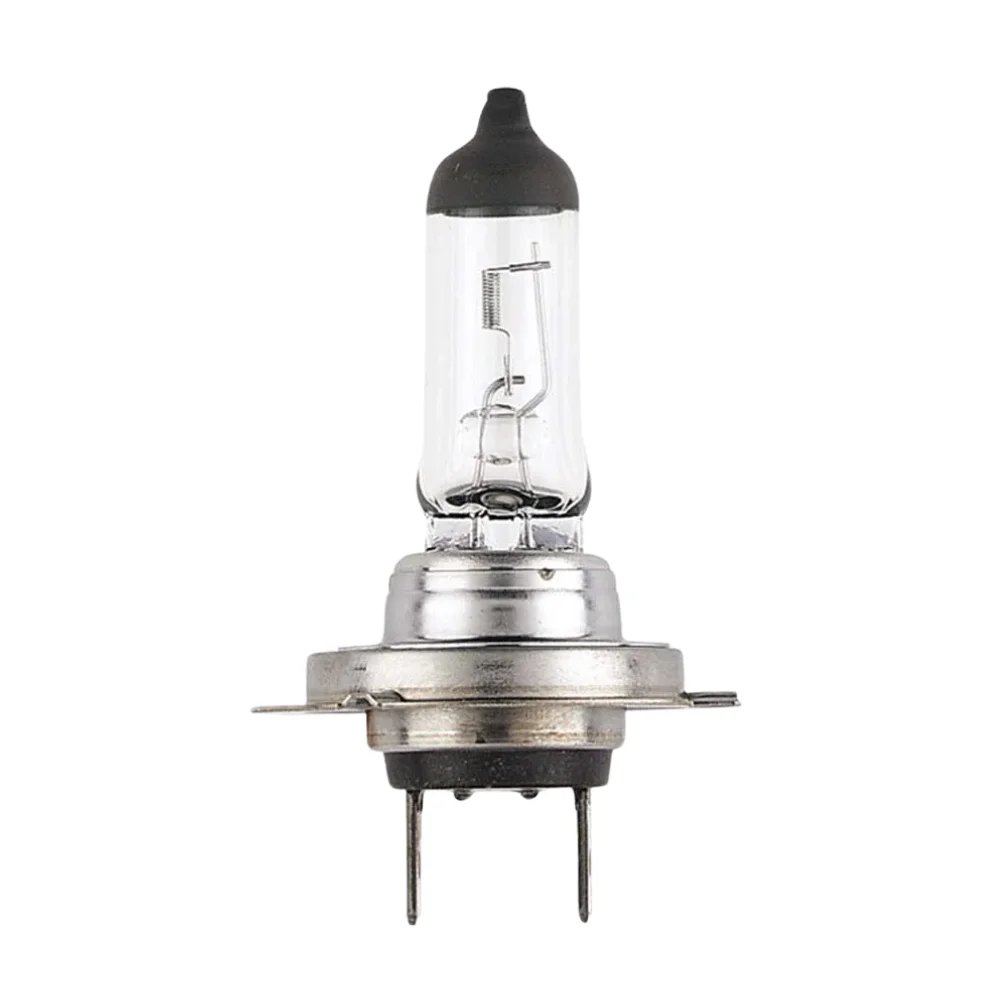
Галогенні лампи для фар
Складність заміни: ⭐ - заміна
Галогенні лампи - найпоширеніші лампи для автомобільних фар і найпростіші в заміні. Вони, як правило, вставляються і виймаються без додаткових компонентів. Просто вийміть стару галогенну лампу і встановіть нову. Не потрібно модифікувати чи перекодовувати електропроводку.
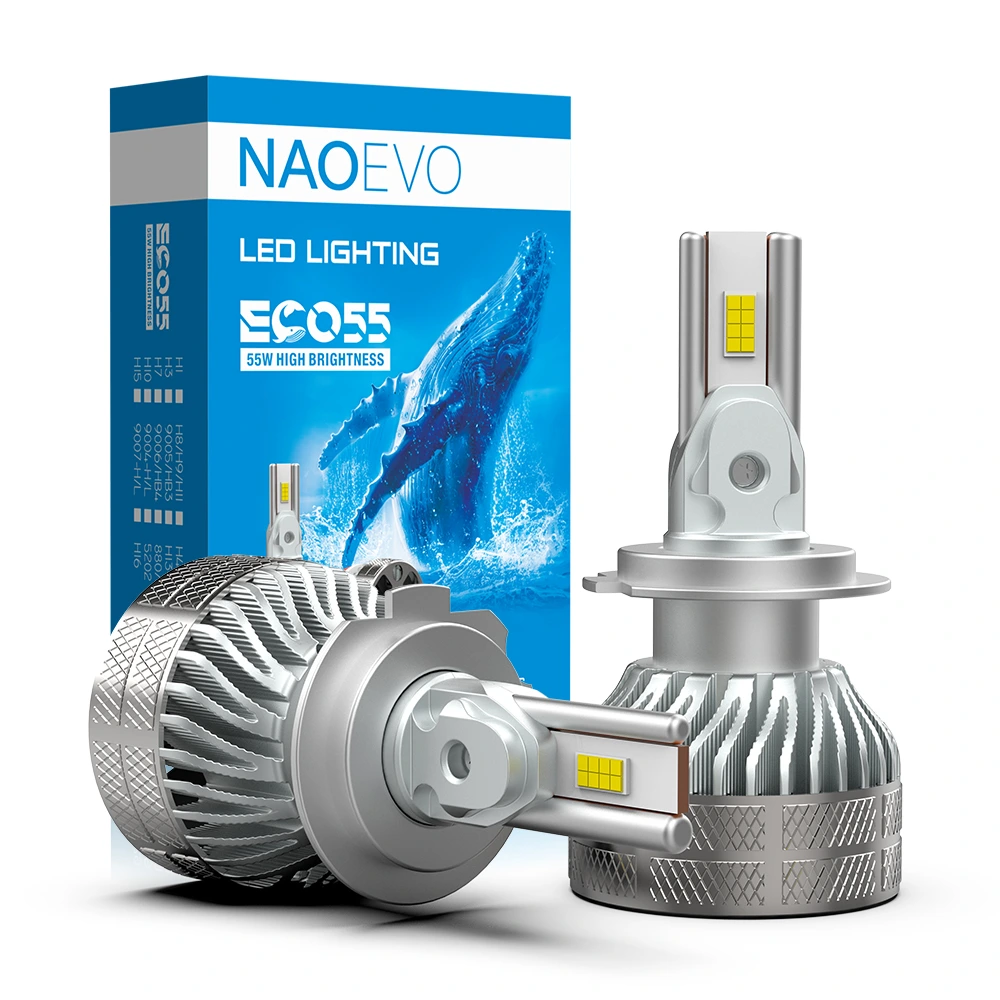
Світлодіодні лампи для фар
Складність заміни: ⭐⭐⭐ Складність заміни: ⭐⭐⭐
Світлодіодні лампи фар популярні завдяки своєму яскравому світлу та довшому терміну служби. Для їх заміни може знадобитися додатковий простір для вбудованого динаміка або вентилятора охолодження. Деякі автомобілі потребують декодерів або адаптерів CANbus, щоб запобігти мерехтінню або попереджувальним світловим сигналам на приладовій панелі при заміні галогенних ламп на світлодіодні.
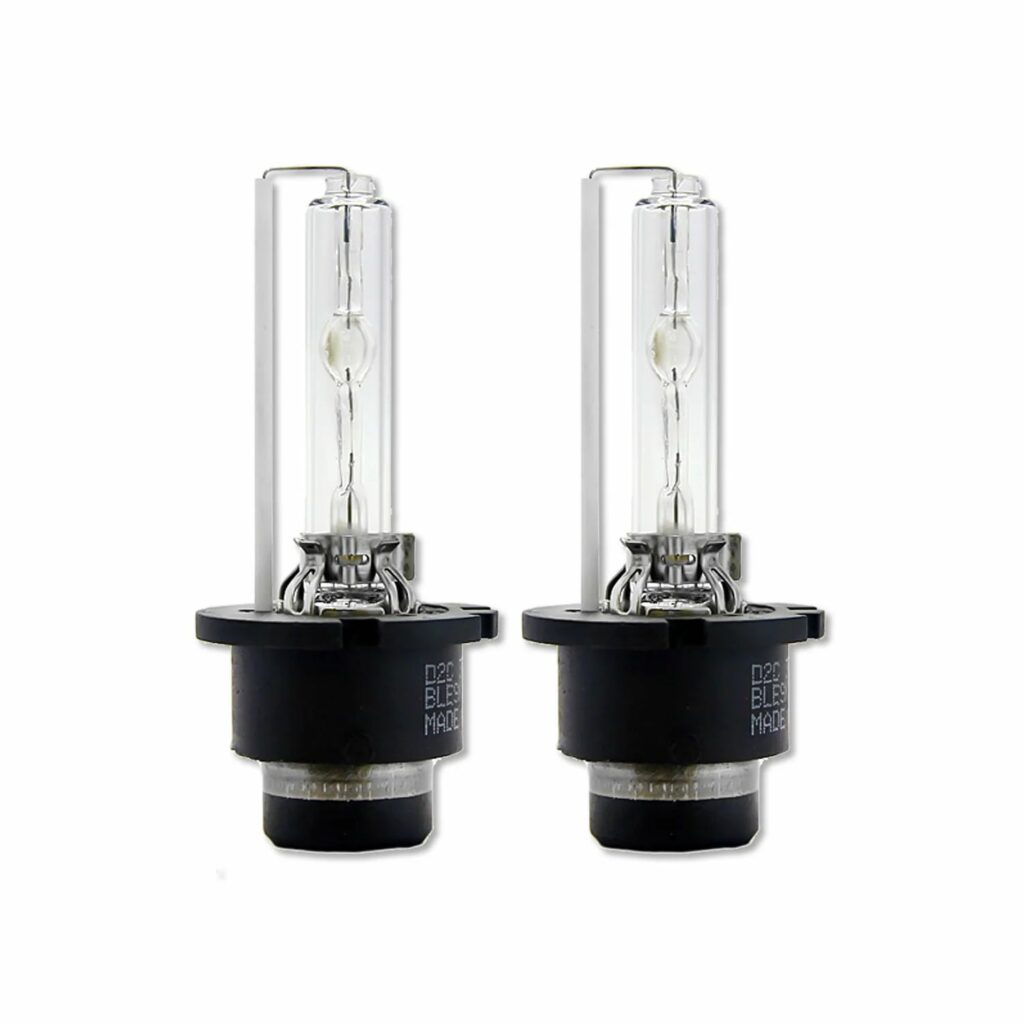
HID лампи для фар
Складність заміни: ⭐⭐⭐⭐
Лампи HID використовують баласт і систему запалювання, що ускладнює їх заміну. Через високу напругу потрібна особлива обережність. При заміні галогенних ламп на HID або HID на світлодіодні, як правило, потрібні додаткові комплекти проводки та перевірка сумісності.
Наскільки складно замінити лампи фар (за марками автомобілів)
Може знадобитися зняти коробку повітряного фільтра
Може знадобитися зняття акумулятора або наповнювача резервуара
Може знадобитися зняття підкладки передньої частини колісної ніші.
Типові моделі:
Toyota Camry
Honda Accord
Mazda 6
Subaru Outback
3. Складно (вимагає зняття бампера або корпусу фари)
Спільна риса:
Дуже тісний простір моторного відсіку
Зняття переднього бампера або внутрішньої обшивки крила
Може знадобитися зняття всієї фари
Типові моделі:
Ford Focus
Volkswagen Golf
Chevrolet Cruze
Mini Cooper
Поширені проблеми після заміни світлодіодних ламп фар
Це деякі з найпоширеніших проблем та шляхи їх вирішення після встановлення світлодіодних фар. Якщо ви хочете дізнатися більше про проблеми, які можуть виникнути після переходу на світлодіодні фари, загляньте в наш блог: Поширені запитання про модернізацію автомобільних фар.
1️⃣ Розсіяне світло, відблиски та засліплення зустрічного транспорту
Можлива причина:
Неправильне положення світлодіодного чіпа, не вирівняне з фокусом рефлектора
Пряма заміна світлодіодів у галогенних корпусах без об'єктива проектора
Встановлення лампи під нахилом або з перекосом
Світлодіодні фари мають надмірну потужність.
💡 Рішення:
Переконайтеся, що лампочка встановлена правильно. Обирайте лампи, які мають розмір 1:1 з оригінальною лампою.
2️⃣ Перегрів або запах гару
Можлива причина:
Нестабільна напруга або перезарядка від генератора змінного струму
Поганий електричний контакт, що спричиняє стрибки напруги
💡 Рішення:
Використовуйте лампи належної потужності та забезпечте достатній приплив повітря.
3️⃣ Коди помилок або миготіння індикаторів
Можлива причина:
Система виявлення освітлення автомобіля, що реагує на несумісний імпеданс світлодіодів
💡 Рішення:
Потрібен декодер Canbus або встановлення малопотужних світлодіодних ламп фар.
4️⃣ Одна сторона яскравіша за іншу
Можлива причина:
Погана якість лампочки фари
Проблема з CANbus
💡 Рішення:
Спробуйте поміняти місцями дві лампочки зліва направо. Встановіть декодер Canbus.
5️⃣ Коротке мерехтіння під час запуску, потім повертається до норми
Можлива причина:
Коливання напруги під час запуску автомобіля.
💡 Рішення:
Якщо індикатор блимає лише один раз під час запуску, а потім працює нормально, це, як правило, вважається нормальною поведінкою і не викликає занепокоєння.
Поширені запитання
Скільки часу потрібно для заміни лампочки автомобільної фари?
Для більшості автомобілів потрібно 5-20 хвилин.
Для деяких моделей з обмеженим простором може знадобитися зняття бампера 30-60 хвилин.
Чи потрібно замінювати обидві лампи фар одночасно?
Так. Одночасна заміна обох ламп гарантує однакову яскравість і колірну температуру з обох боків. Це також запобігає нерівномірному світловому потоку і зменшує ймовірність того, що друга лампа вийде з ладу незабаром після заміни.
Чи легальна післяпродажна світлодіодна лампа для фар?
Несанкціонована модифікація світлодіодних фар автомобіля може бути незаконною в деяких країнах. Це залежить від конкретної країни або регіону, тому рекомендується перевіряти місцеві закони та правила, перш ніж робити будь-які зміни.
Чи потрібно від'єднувати акумулятор перед заміною лампи фари?
Для стандартної заміни галогенної лампи від'єднання акумулятора не завжди є обов'язковим, але рекомендується з міркувань безпеки.
Для HID або світлодіодних систем від'єднання акумулятора допомагає запобігти електричним проблемам або короткому замиканню.
Чи потрібен проектор при переході на світлодіодні фари?
Якщо у вашому автомобілі немає проектора, рекомендується встановлювати при переході на світлодіодні фари. Проектор створює чітку лінію відсікання і утримує світло сфокусованим на дорозі, зменшуючи відблиски.
Якщо ви не плануєте встановлювати проектор, обирайте високоякісна світлодіодна лампа для фар з сильним фокусуванням променя і правильним дизайном світлової картини, щоб уникнути розсіяного світла.
NAOEVO є провідним професійним виробником, що спеціалізується на розробці, виробництві та продажу автомобільних світлодіодних ліхтарів, пропонуючи комплексні рішення в галузі автомобільного освітлення.
WhatsApp
Привіт, ласкаво просимо до NAOEVO.
Діапазон часу ручного обслуговування клієнтів в режимі реального часу Пн.-пт. 09:00~18:00 (UTC+8).
Будь ласка, залиште своє запитання тут, і воно буде оперативно розглянуто наступного робочого дня.
Як ми можемо допомогти вашому бізнесу вже сьогодні?


 WhatsApp